Monday 12 November 2007

HKS Blow Off Valve with Quick Fitting Guide

My HKS BOV has arrived at last. 8 weeks from HKS Japan.
Sorry I can't give a proper fitting guide, but i fiitted it in a pub car park. And forgot my camera.
It only took 10 mins start to finish. Very easy to do.
If you looking for one. HKS list them under Supra JA70 1JZGTE. Same Engine.
Original Recirculating Dump Valve
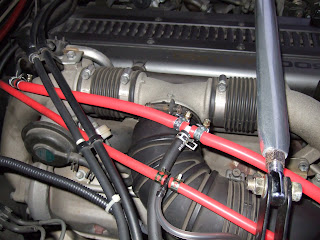
Held on with 2 bolts. Undo and remove.Loosen Hose Clip and pull the hose off.

Pull off vacuum hose.

Fit blanking plug with seal. 1 bolt to tighten.

Fit new hose to turbo outlet pipe and tighten clip.

Fit BOV to hose and fit vacuum hose.

Secure BOV with fitting kit.

Done.


Stereo and Amp Wiring etc


Front Bumper


Exhaust Intake and Turbos


Monday 1 October 2007

Fitting Silicone Hoses (Part One)

I’m going to start off by replacing the Top radiator Hose and the Intercooler to Inlet Hose

Locate the Top Hose

Undo the retaining clips

Get a container, to catch any water leeks

Prise the front end of the hose off, then lift it up to stop it spilling water

Put the container under the engine side of the hose, and prise it off


Place the clips on the new Silicone Hose (a couple of inches from the ends)

Push the new hose ends on, and move the clips to the ends and secure

Poor the water from the container back into the Radiator


Locate the Intercooler Hose (from the intercooler to the inlet)

Undo the retaining clips


Prise the ends of the hose off, and remove


Place the clips on the new Silicone Hose (a couple of inches from the ends)

Push the new hose ends on, and move the clips to the ends and secure


Sunday 30 September 2007

Fitting a Power Capacitor

This is very simple and easy to do

The Capacitor needs to be placed in-line of the main power supply lead to the Amp

Find a location to mount the Capacitor (mount as close to the Amp as possible)

Fit a Negative Earth cable to the ( - ) terminal of the Cap (try to keep as short as possible)

Fit the Power supply cable (from the battery) to the ( + ) terminal of the Capacitor

Fit a cable from the Capacitor ( + ) terminal (on top of the battery cable) to your Amp


Done

Guide to fitting a Amp and Boot Neons

Fitting a Amp and a few extras

Fitting new battery terminals

First locate the battery


Undo the retaining nuts

Cut the wire next to the terminal


Fit the new terminal


Do the same with the positive, there will be two wire on this side

Connect the terminals to the battery

Do not connect the Positive wire at this point

NEXT Get your amp wiring and fit an in-line fuse approx 1’ form the battery terminal

Root the wire round the engine bay, and make sure it doesn’t touch anything hot


Locate the bulkhead grommet


Cut a hole in it, and pass the wire through


You now need to remove the lower part of the drivers dash
4 nuts hold it


You will also need a switch wire from the Head Unit to the Amp
Root a wire from the footwell

Remove the trim above the door sill
It just pulls off


Pull the carpet up and root the wires through


Now remove the rear seats
Pull the lower seat off, by just lifting it up


Undo the retaining nuts of the rear seat, then lift it up and off


Now pass the wires behind the rear side panel
Remove the retaining clip and lift up


Next find the rear bulk grommets


Cut a hole and pass the wires through

Next you need the root the RCA wires from the Head Unit to the Amp

Remove the passenger footwell carpet


Root the RCA’s under it

Now remove the sill trim as earlier

Root the wires through as before

Cut the bulkhead grommet and push the wires through


Root the wires into the boot


At this time I decided to fit some Neon Tubes into the boot

Locate the boot light


Pull it out and detach the wiring plug

Get a Multi Meter and find which wire is Positive etc

Splice into the wires and connect two lengths of wire

Refit the boot light

I changed the bulb to a blue one

Find a place to fit your neons and screw them in


Cut a hole in the lining and pass the wires through


Connect the neons to the loom

Now find a place for your Sub Box

Find a mounting place for you Amp, and secure it


Connect the wires to the Amp

Connect the Amp to the Sub Box

Now connect the wires to the Head Unit

Connect the Positive wire to the battery terminal Turn you ignition on, and listen to the bass

When you open the boot, the neons should turn on and look like this